The Basecamp serves as the central hub for your Podcatcher Pro's, handling both charging and content synchronization. Proper installation ensures reliable operation and simplifies daily management for your staff. This guide will walk you through the complete setup process to get your Basecamp operating efficiently in your museum environment.
QUICK REFERENCE
- Choose an accessible location with stable network and power access
- Mount the Basecamp using the wall bracket or place on a stable surface
- Connect power and network cables
- Verify LED indicators show proper connection
- Register your Basecamp in the Guide-ID platform
Prerequisites
Before beginning installation, ensure you have:
- Basecamp unit with power adapter
- Ethernet cable for wired connection
- Access to a power outlet
- Strong Wi-Fi signal in the installation area (if using wireless connection)
- Guide-ID platform access
- Your unique Basecamp registration code (found on the bottom of the unit)
1. Selecting the Ideal Location
The location of your Basecamp significantly impacts both staff workflow and system performance.
Consider these factors when choosing a location:
- Accessibility: Position the Basecamp where staff or visitors can easily insert and remove Podcatchers
- Network connectivity: Ensure strong, stable network connection (wired preferred)
- Power availability: Position near a reliable power outlet
- Environment: Install in a clean, dry area with adequate ventilation
TIP: For museums with multiple floors or separate exhibition areas, consider installing multiple Basecamps strategically placed to minimize staff movement during daily operations.
2. Installation Options
The Basecamp can be installed in two ways depending on your space and preferences.
Wall-Mounting
- Using the mounting template, mark the drill positions on your wall
- Ensure the mounting location can support the Basecamp's weight (approximately 5.2 kg when fully loaded with Podcatchers)
- Drill holes according to the template and insert wall anchors if needed
- Attach the mounting bracket securely to the wall using screws (not provided)
- Carefully hang the Basecamp on the bracket, ensuring it locks into place
- Verify the unit is level and firmly attached
CAUTION: Ensure the wall material can support the Basecamp's weight. For drywall installations, always use appropriate anchors rated for the total weight.
Desktop placement
- Select a stable, level surface with adequate space (minimum 50cm × 30cm)
- Ensure the surface can support the Basecamp's weight
- Position the Basecamp with at least 10cm clearance on all sides for proper ventilation
- Consider securing the Basecamp to the surface in high-traffic areas
NOTE: Desktop placement is ideal for temporary installations or locations where wall-mounting isn't feasible.
3. Connecting to Power and Network
Reliable power and network connections are essential for proper Basecamp operation.
Power Connection
- Connect the provided 65W power adapter to the Basecamp's power input port
- Plug the power adapter into a surge-protected outlet
- Verify the power LED indicator illuminates (steady green light)
WARNING: Use only the Guide-ID power adapter provided with your Basecamp.
Network Connection
The Basecamp offers both wired and wireless connection options:
Wired Connection (Recommended)
- Connect one end of the Ethernet cable to the network port on the Basecamp
- Connect the other end to your network router or wall network outlet
- Verify the network LED indicator shows activity (third LED should be green)
Wireless Connection
If an Ethernet connection is unavailable, follow these steps to connect your Basecamp to Wi-Fi:
- Initiate the Basecamp Wi-Fi hotspot: After powering on, the Basecamp will automatically establish a Wi-Fi hotspot if no Ethernet connection is detected. This process generally completes within two minutes.
- Identify the access point: On your mobile device or computer, scan for available Wi-Fi networks. The Basecamp hotspot will appear under your device's model name (e.g., 'bc000123').

- Connect to the Basecamp's Wi-Fi hotspot: Select the identified network and enter the default password 'podcatcher' to connect to the hotspot.
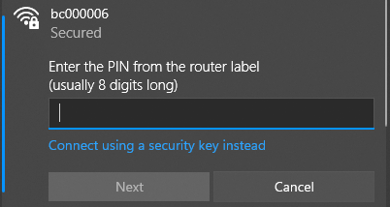
- Note: When using a Windows laptop/computer, by default a PIN code is shown. Please click on 'Connect using a security key instead'.
- Access the Wi-Fi configuration page: Once connected, a pop-up window should prompt you to log in to the network. Click on this pop-up to open the Basecamp's Wi-Fi configuration page.

- Select your preferred Wi-Fi network: Choose your museum's Wi-Fi network from the drop-down menu, then enter your network's password and click 'Connect.' Upon successful connection, the Basecamp will turn off its Wi-Fi hotspot and connect to your chosen network instead.
NOTE: The specific details regarding the Wi-Fi network and password should be provided by your organization's IT department.
TIP: Confirm successful connection when the third LED light on the Basecamp device turns green.
IMPORTANT: Ensure your network meets all requirements for proper operation. Review our detailed Network Requirements article in the knowledge base to prepare your network infrastructure.
4. Registering Your Basecamp
After physical installation, you'll need to register your Basecamp in the Guide-ID platform.
- Log in to your Guide-ID platform account
- Navigate to Hardware → Basecamps
- Click the Add Basecamp button
- Enter your Basecamp's unique registration code (found on the bottom of the unit)
- Provide a descriptive name for your Basecamp (e.g., "Main Entrance" or "Special Exhibition Area")
- Click Register Basecamp to complete the process
NOTE: Your Basecamp must be powered on and connected to the network before it will turn online in the Platform.
7. Common Installation Issues
| Issue | Possible Cause | Solution |
|---|---|---|
| No power indicator | Power adapter not connected properly | Check all power connections |
| No network connection | Network cable loose or network issue | Verify cable connections and network status |
| Basecamp not appearing in platform | Registration incomplete or network issue | Re-enter registration code and check network |
| Podcatchers not charging | Improper insertion or charging contacts issue | Clean contacts and reinsert Podcatchers |
In the unlikely event that something does not go to plan, the LED lights indicate exactly what is going wrong. On the LED indication page, you can see all the info you need to get back on track.
8. Optimization Tips
- Cable management: Use cable ties to keep power and network cables organized
- Label your Basecamp: Add a physical label with its name to match the platform designation
- Create a charging schedule: Establish regular times for Podcatcher charging to ensure availability
- Multiple Basecamps: For larger museums, consider dedicated Basecamps for different exhibition areas
Next Steps
Now that your Basecamp is installed, you're ready to:
- Basecamp Overview
- Podcatcher Overview
- Adding Beacons
- Creating Your First Tour
- LED indication Basecamp
For additional support, contact the Guide-ID technical team at helpdesk@guide-id.com or call +31 (0)570 572 202