Hardware
Installing Your Basecamp
The Basecamp functions as a central hub for your Podcatcher Pro devices, handling both charging and content synchronization. Proper installation ensures reliable operation and streamlines device management.
Prerequisites
Section titled “Prerequisites”Before installation, you will need:
- Basecamp unit with power adapter
- Ethernet cable for wired connection
- Access to a power outlet
- Strong Wi-Fi signal (if using wireless)
- Guide-ID platform access
- Unique Basecamp registration code (found on the bottom of the unit)
Step 1 — Select the ideal location
Section titled “Step 1 — Select the ideal location”Consider these factors when choosing a spot:
- Accessibility — Position where staff can easily insert and remove Podcatcher Pro devices
- Network connectivity — Ensure a strong, stable connection (wired is preferred)
- Power availability — Place near a reliable power outlet
- Environment — Install in a clean, dry area with adequate ventilation
Step 2 — Mount or place the Basecamp
Section titled “Step 2 — Mount or place the Basecamp”Wall mounting
Section titled “Wall mounting”- Mark drill positions using the mounting template
- Verify the wall and anchors can support a fully loaded Basecamp (the unit plus up to 25 docked Podcatcher Pro devices)
- Drill holes and insert wall anchors if needed
- Attach the mounting bracket securely with screws
- Hang the Basecamp on the bracket and verify it locks in place
- Check the unit is level and firmly attached
Desktop placement
Section titled “Desktop placement”- Select a stable, level surface (minimum 50 cm x 30 cm)
- Verify the surface supports the Basecamp’s weight
- Position with at least 10 cm clearance on all sides
- Secure to the surface in high-traffic areas if needed
Step 3 — Connect power and network
Section titled “Step 3 — Connect power and network”Power connection
Section titled “Power connection”- Connect the 65W power adapter to the Basecamp’s power input
- Plug the adapter into a surge-protected outlet
- Verify the power LED illuminates with a steady green light
Wired connection (recommended)
Section titled “Wired connection (recommended)”- Connect an Ethernet cable to the network port on the Basecamp
- Connect the other end to your network router or wall outlet
- Verify the network LED shows activity (third LED turns green)
Wireless connection
Section titled “Wireless connection”- Initiate hotspot — The Basecamp automatically creates a Wi-Fi hotspot if no Ethernet cable is detected (takes up to two minutes)
- Find the access point — Scan for available Wi-Fi networks; the Basecamp appears under its device model name (e.g.,
bc000123) - Connect to the hotspot — Select the network and enter the default password:
podcatcher - Open configuration page — A login pop-up opens the Basecamp’s Wi-Fi configuration page
- Select your network — Choose your venue’s Wi-Fi from the drop-down menu, enter the password, and click Connect
Confirm a successful connection when the third LED turns green.
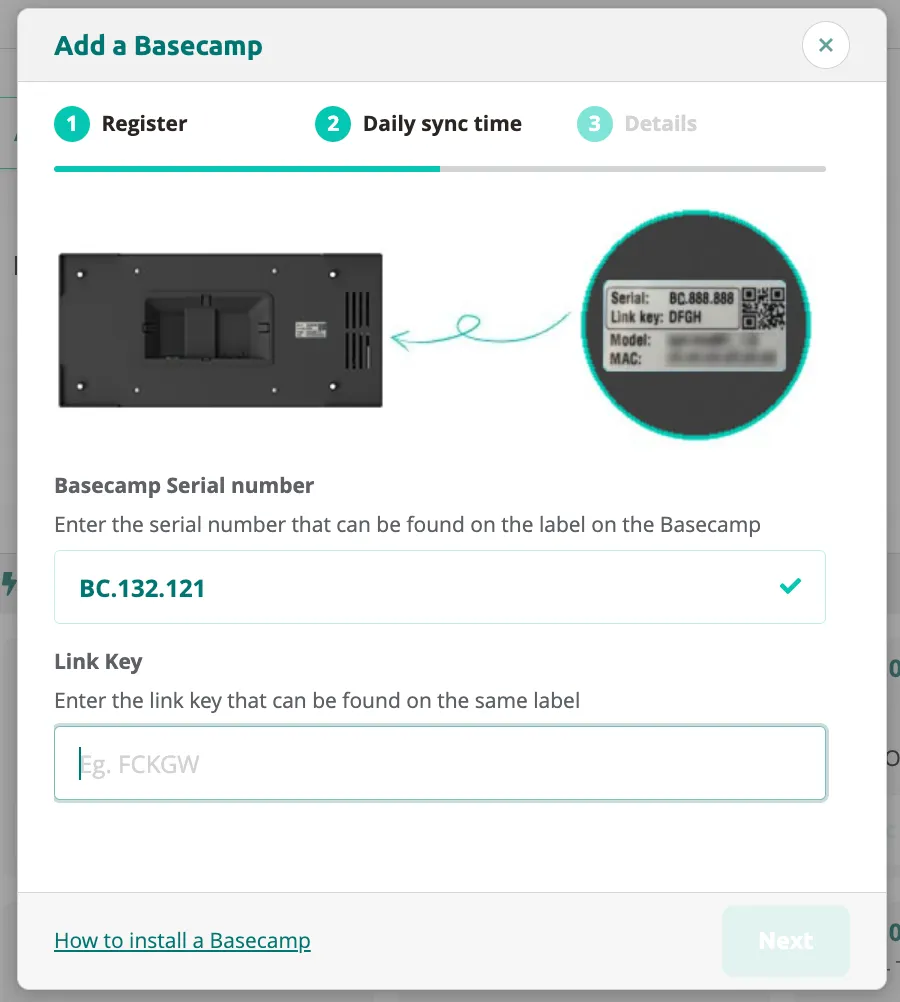
Step 4 — Register your Basecamp
Section titled “Step 4 — Register your Basecamp”- Log in to your Guide-ID platform account
- Navigate to Hardware → Basecamps
- Click Add new Basecamp
- Enter the serial number and link key found on the device label
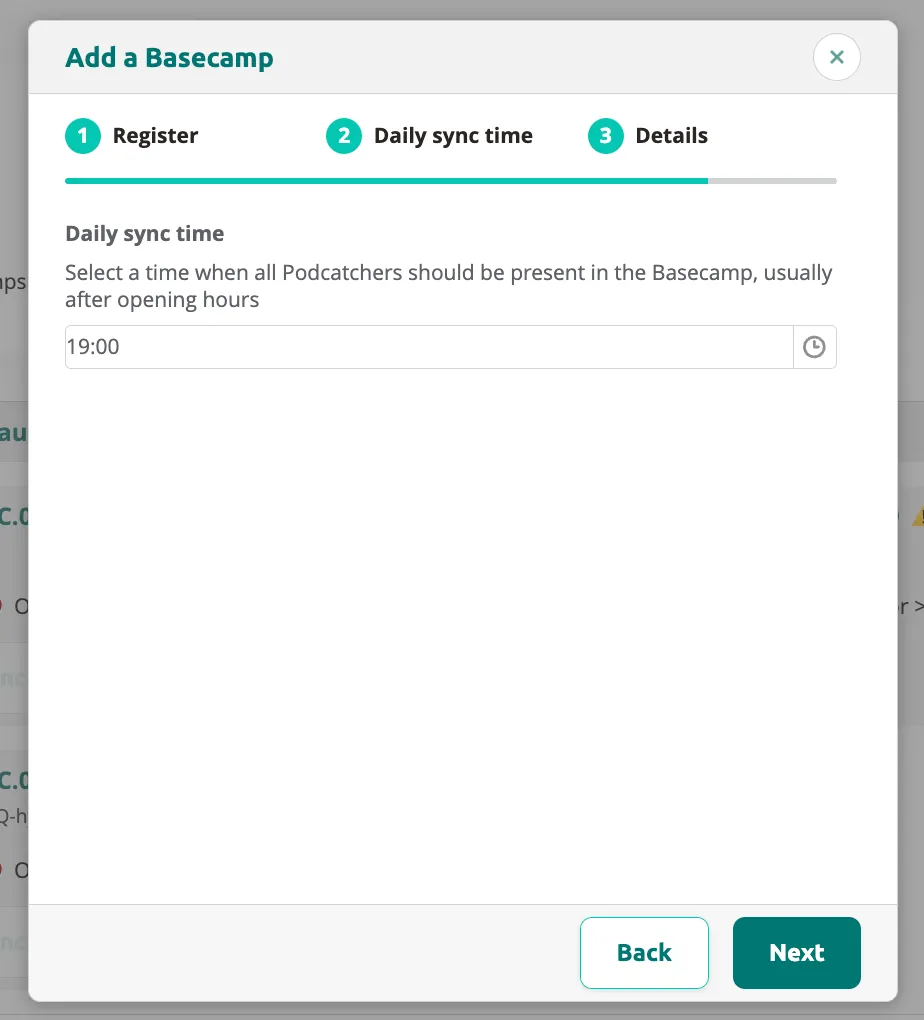
- Set the daily sync time — this is when Podcatchers should be placed in the Basecamp for content updates
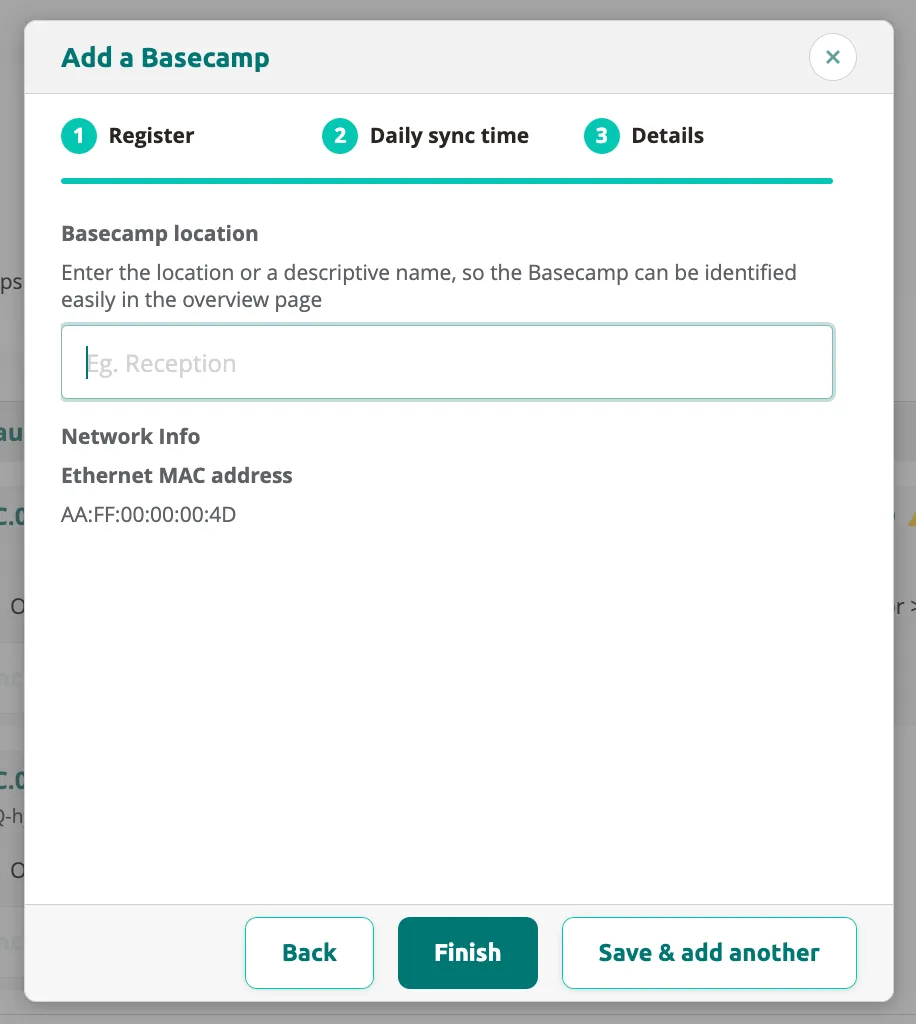
- Enter a location name and review the network information, then click Finish (or Save & add another to register additional Basecamps)
Troubleshooting
Section titled “Troubleshooting”| Issue | Possible cause | Solution |
|---|---|---|
| No power indicator | Power adapter disconnected | Check all power connections |
| No network connection | Loose cable or network issue | Verify connections and network status |
| Basecamp not in platform | Incomplete registration or network issue | Re-enter code and check network |
| Podcatcher Pro not charging | Improper insertion or contact issues | Clean contacts and reinsert |
Optimization tips
Section titled “Optimization tips”- Use cable ties to keep power and network cables organized
- Add physical labels matching platform designations
- Establish a regular Podcatcher Pro charging schedule
- Install multiple Basecamps in different areas for larger venues
Related articles
Section titled “Related articles”- Basecamp Overview — manage and monitor your Basecamps
- LED Indication Basecamp — understand Basecamp status LEDs
- Network Requirements — connectivity prerequisites for setup
Was this article helpful?